PREMISE
C2C means “Corner To Corner”.
This crochet technique is called this way because you will work from a corner to a corner, instead of working in normal horizontal rows or in a round.
The C2C technique can be done with many different crochet stitches, but usually is referred to a particular stitch which uses squares to build the work.
These square are usually created with a combination of Double Crochet (DC – US Terminology) and Chains.
The C2C – Corner To Corner I’m going to show you today is called “Mini C2C” and it will be done with a combination oh Half Double Crochet (HDC – US Terminology) and Chains.
The differences between the two (C2C and Mini C2C) is simply that the second one will result smaller and with less holes between the stitches.
You can watch two video-tutorials about this technique:
Here below you also have the FREE pattern of the small rectangle you see in the second video.
This pattern is totally free, but it’s intellectual property of Elendipity:
you can use it and, of course, you can sell the final products you create, but you cannot sell the pattern.
You should also credit Elendipity (as pattern creator) whenever you create/sell the final product.
Feel free to tag me on my Instagram if you create something with this technique, I would love to see your works!!
HOW TO
MATERIAL
I used:
- 5mm crochet hook (please check your yarn label to use the right crochet hook)
- White Acrylic Yarn (worst weight)
- Green Acrylic Yarn (worst weight)
TERMS
Here below the list of the stitches (US terms) you are going to use for this project.
Watch the videos to see how to combine the stitches and to create the squares.
- CH = Chain
- SS = Slip Stitch
- HDC = Half Double Crochet
INSTRUCTIONS
VIDEO-TUTORIAL 1/2 – Mini C2C (Corner to Corner) | How To:
VIDEO-TUTORIAL 2/2 – Mini C2C (Corner to Corner) | How To read a pattern and how to change colour:
Below the video you find the pattern explained in the video.
RECTANGLE Patterns
- CHARTS
Pin - WRITTEN INSTRUCTIONS
G = Green
W= White
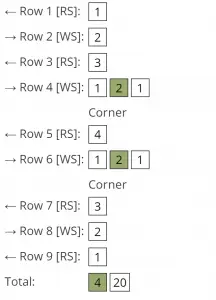
← Row 1 [RS]: (w) x 1 (1 square)
→ Row 2 [WS]: (w) x 2 (2 squares)
← Row 3 [RS]: (w) x 3 (3 squares)
→ Row 4 [WS]: (w) x 1, (G) x 2, (w) x 1 (4 squares) Corner
← Row 5 [RS]: (w) x 4 (4 squares)
→ Row 6 [WS]: (w) x 1, (G) x 2, (w) x 1 (4 squares) Corner
← Row 7 [RS]: (w) x 3 (3 squares)
→ Row 8 [WS]: (w) x 2 (2 squares)
← Row 9 [RS]: (w) x 1 (1 square)
Total: (G) x 4, (w) x 20
- BLOCKs INSTRUCTIONS
Pin I hope you found these video helpful!
If you want, you can follow me on Instagram (@_elendipity_) for next projects, video and patterns!
At this link you can find all my FREE patterns.
Happy crochet!
🥰
- About the Author
- Latest Posts
Hi, I’m Eleonora. I grew up in Milan and have been living in London since 2019. I left a corporate career to turn my lifelong passion for crafts into a full-time creative business. Creating with my hands has always been part of who I am – from crochet to sewing, from small handmade projects to full garments. I also have a soft spot for animals, especially cats. I started crocheting at a young age and later taught myself how to sew through books and online tutorials. Over time, I began experimenting with different techniques, patterns, and materials, discovering just how powerful and calming handmade creativity can be. That journey led me to share my knowledge online, first through YouTube and later through classes, patterns, and workshops. Today, I’m a crochet and embroidery teacher, helping others learn at their own pace and find confidence through making.


