
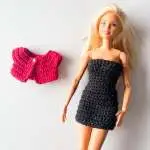
Abie Dress – Doll Crochet Strapless Dress

Barbie Strapless DressPin

PREMISE

I love crocheting and sewing outfits for Tiffany, my Barbie doll. 

I often create them without a pattern, but sometimes I remember to write down the steps as I go. 

That’s the case with this one.

The latest doll pattern I released was a charming autumn/winter coat. Check out the picture!

You can find the pattern at this link.

PATTERN INFORMATION

The pattern in this page is totally free, but it’s intellectual property of Elendipity.
You can use it and, of course, you can sell the final products you create, but you cannot sell the pattern or any alteration of the pattern.

It would be nice also if you could credit Elendipity (as pattern creator) whenever you create it, share it and/or sell it.

Feel free to tag me on my Instagram if you create it, I would love to see your works!!

Barbie Strapless DressPin
Barbie crochet dress with shrugPin
Barbie Strapless DressPin

HOW TO

The Abie Dress is crocheted as a single piece, working from the top down.

Rows are worked with alternating increases and decreases to shape the dress to fit the doll’s body.

Snap fasteners are added to the back of the dress for closure.

It’s crucial to have the specified gauge (see below) to ensure the correct size.

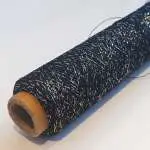
To give a glittery feeling, I used a black / glitter thread together with the main yarn, but it’s absolutely optional.

Pin
MATERIAL

I used:

  • Crochet Hook: 2 mm
  • Hobbii Rainbow Cotton 8/4, colour n. 09 (Black) – about 10 gr (Yarn weight: 2/3 ply or superfine)
  • 6 mini snap fasteners (5 mm diameter)
  • Yarn scissors or thread snips
  • Darning needle
  • Optional: Stitch Markers
  • Optional: extra fine glitter thread. I used a black / gold thread (see picture above), you can find something similar in the Glitter Deluxe collection always on Hobbii. 

You can find the Hobbii Rainbow Cotton 8/4 at this link, if you want to find any yarn substitution you can use the website yarnsub.com.

TERMS

Here below the list of the stitches (US terms) that you are going to use for this project.

  • CH = Chain
  • SC = Single Crochet
  • INC = Increase (2 Single Crochet in the same stitch)
  • DEC = Decrease (1 Single Crochet worked over two previous stitches) – also called SC2TOG = 2 Single Crochet Together
  • Number in brackets, at the end of each round, indicates the total stitches for the round.
  • Instruction between * … * means you have to repeat what is between the asterisks by the times indicated after the second asterisk.
  • Instruction between ( … ) means you have to do all the stitches in the brackets in the same stitch.
  • You will always find the acronym of the stitch and a number close to it; if the number is before the name of the stitch, it means that you will have to repeat those stitches in the same space. For example: 5 SC = 5 Single Crochet in the same stitch / SC 5 = 5 Single Crochet in the next 5 stitches
GAUGE

The Gauge to reach 10 cm x 10 cm (or 4″ x 4″) is:

28 st x 26 rows

The Gauge is done with Single Crochet (US terms).

SIZE

This is made for a standard Barbie doll.

Shall we start? 

Let’s go!!

START

CH 35

  • R1

Starting from 2nd CH from the hook, do SC 34, CH 1 and turn (34)

TIP: I would recommend to work this first row in the back bump of the chain for a neater finishing, but it’s optional, you can work as normal if you prefer it or if you are a beginner.

  • R2

SC 14, INC, SC 4, INC, SC 14, CH 1 and turn (36)

  • R3

SC 36, CH 1 and turn (36)

  • R4

SC 6, * DEC, SC 1 * x 3, DEC, SC 2, * DEC, SC 1 * x 3, DEC, SC 6, CH 1 and turn (28)

  • R5

SC 13, DEC, SC 13, CH 1 and turn (27)

  • R6 – R9 (4 rows)

SC 27, CH 1 and turn (27)

  • R10

SC 3, * INC, SC 4 * x 4, INC, SC 3, CH 1 and turn (32)

  • R11

SC 32, CH 1 and turn (32)

  • R12

SC 5, INC, SC 5, INC, SC 4, INC, SC 3, * INC, SC 5 * x 2, CH 1 and turn (37)

  • R13 – R24 (12 rows)

SC 37, CH 1 and turn (37)

In the last row (R24) don’t CH 1 and don’t turn.

Fasten off and weave in ends.

SNAP FASTENERS

Now you will sew the snap fasteners in.

Snap fasteners consist of two parts: a male piece with a small post, and a female piece with a hole.

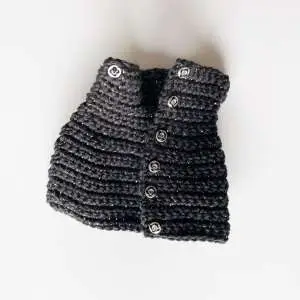
You’ll need a total of six snaps, evenly spaced along the length of the dress – place one snap every three rows, ensuring the snaps on opposite sides of the dress are aligned in the same rows.

Sew the female parts to the outer side of the dress, as shown on the right side of the picture where all six snaps are attached.

Next, sew the male fastener pieces to the inside of the dress. The picture shows only one male part sewn in (on the left).

Barbie Doll crochet dressPin

Congratulations!

Now your Abie dress is finished! I made Tiffany also a shrug (Abie Shrug) to wear with her dress.

You can find the Shrug Free Pattern at this link.

Barbie Doll crochet dressPin
Barbie crochet dress with shrugPin

I hope you enjoyed this Free Pattern 🥰Pin

I have other many patterns available that you can find at this link.

Don’t hesitate to contact me if you need any explanation for the pattern – you can comment below or write me at info@elendipity-com.stackstaging.com.

I also offer crochet lessons (both in person or online) if you need some help with crochet creations and reading patterns. You find all the info for the classes at this link.

Feel free to tag me on my Instagram if you create it, I would love to see your works!6

Happy Crocheting! 


Leave a Comment

Your email address will not be published. Required fields are marked *

Scroll to Top
Share to...