
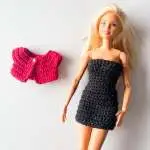
Abie Dress – Doll Crochet Strapless Dress

PinI love crocheting and sewing outfits for Tiffany, my Barbie doll.
I often create them without a pattern, but sometimes I remember to write down the steps as I go.
That’s the case with this one.
The pattern in this page is totally free, but it’s intellectual property of Elendipity.
You can use it and, of course, you can sell the final products you create, but you cannot sell the pattern or any alteration of the pattern.
It would be nice also if you could credit Elendipity (as pattern creator) whenever you create it, share it and/or sell it.
Feel free to tag me on my Instagram if you create it, I would love to see your works!!
Pin
Pin
Pin The Abie Dress is crocheted as a single piece, working from the top down.
Rows are worked with alternating increases and decreases to shape the dress to fit the doll’s body.
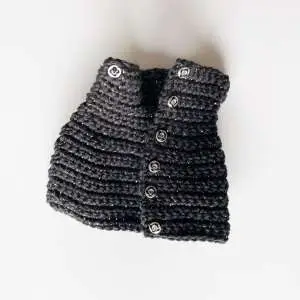
Snap fasteners are added to the back of the dress for closure.
It’s crucial to have the specified gauge (see below) to ensure the correct size.
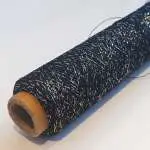
To give a glittery feeling, I used a black / glitter thread together with the main yarn, but it’s absolutely optional.
Pin I used:
You can find the Hobbii Rainbow Cotton 8/4 at this link, if you want to find any yarn substitution you can use the website yarnsub.com.
Here below the list of the stitches (US terms) that you are going to use for this project.
The Gauge to reach 10 cm x 10 cm (or 4″ x 4″) is:
28 st x 26 rows
The Gauge is done with Single Crochet (US terms).
This is made for a standard Barbie doll.
Shall we start?
Let’s go!!
START
CH 35
Starting from 2nd CH from the hook, do SC 34, CH 1 and turn (34)
TIP: I would recommend to work this first row in the back bump of the chain for a neater finishing, but it’s optional, you can work as normal if you prefer it or if you are a beginner.
SC 14, INC, SC 4, INC, SC 14, CH 1 and turn (36)
SC 36, CH 1 and turn (36)
SC 6, * DEC, SC 1 * x 3, DEC, SC 2, * DEC, SC 1 * x 3, DEC, SC 6, CH 1 and turn (28)
SC 13, DEC, SC 13, CH 1 and turn (27)
SC 27, CH 1 and turn (27)
SC 3, * INC, SC 4 * x 4, INC, SC 3, CH 1 and turn (32)
SC 32, CH 1 and turn (32)
SC 5, INC, SC 5, INC, SC 4, INC, SC 3, * INC, SC 5 * x 2, CH 1 and turn (37)
SC 37, CH 1 and turn (37)
In the last row (R24) don’t CH 1 and don’t turn.
Fasten off and weave in ends.
Now you will sew the snap fasteners in.
Snap fasteners consist of two parts: a male piece with a small post, and a female piece with a hole.
You’ll need a total of six snaps, evenly spaced along the length of the dress – place one snap every three rows, ensuring the snaps on opposite sides of the dress are aligned in the same rows.
Sew the female parts to the outer side of the dress, as shown on the right side of the picture where all six snaps are attached.
Next, sew the male fastener pieces to the inside of the dress. The picture shows only one male part sewn in (on the left).
Pin Congratulations!
Now your Abie dress is finished! I made Tiffany also a shrug (Abie Shrug) to wear with her dress.
You can find the Shrug Free Pattern at this link.
Pin
Pin I hope you enjoyed this Free Pattern Pin
I have other many patterns available that you can find at this link.
Don’t hesitate to contact me if you need any explanation for the pattern – you can comment below or write me at info@elendipity-com.stackstaging.com.
I also offer crochet lessons (both in person or online) if you need some help with crochet creations and reading patterns. You find all the info for the classes at this link.
Feel free to tag me on my Instagram if you create it, I would love to see your works!6
Happy Crocheting!
Hi, I’m Eleonora. I grew up in Milan and have been living in London since 2019. I left a corporate career to turn my lifelong passion for crafts into a full-time creative business. Creating with my hands has always been part of who I am – from crochet to sewing, from small handmade projects to full garments. I also have a soft spot for animals, especially cats. I started crocheting at a young age and later taught myself how to sew through books and online tutorials. Over time, I began experimenting with different techniques, patterns, and materials, discovering just how powerful and calming handmade creativity can be. That journey led me to share my knowledge online, first through YouTube and later through classes, patterns, and workshops. Today, I’m a crochet and embroidery teacher, helping others learn at their own pace and find confidence through making.
| Cookie | Duration | Description |
|---|---|---|
| cookielawinfo-checkbox-analytics | 11 months | This cookie is set by GDPR Cookie Consent plugin. The cookie is used to store the user consent for the cookies in the category "Analytics". |
| cookielawinfo-checkbox-functional | 11 months | The cookie is set by GDPR cookie consent to record the user consent for the cookies in the category "Functional". |
| cookielawinfo-checkbox-necessary | 11 months | This cookie is set by GDPR Cookie Consent plugin. The cookies is used to store the user consent for the cookies in the category "Necessary". |
| cookielawinfo-checkbox-others | 11 months | This cookie is set by GDPR Cookie Consent plugin. The cookie is used to store the user consent for the cookies in the category "Other. |
| cookielawinfo-checkbox-performance | 11 months | This cookie is set by GDPR Cookie Consent plugin. The cookie is used to store the user consent for the cookies in the category "Performance". |
| viewed_cookie_policy | 11 months | The cookie is set by the GDPR Cookie Consent plugin and is used to store whether or not user has consented to the use of cookies. It does not store any personal data. |