I love to be surrounded by creative people, for all crafts.
Therefore of course I’m in some crafts groups on Facebook and more specifically crochet and sewing groups.
One of the things I noticed in various crochet groups is that most of the people (and I am definitely one of them) don’t like sewing parts.
So I decided to start creating some animals amigurumi with NO SEWING at all!!
And here we are with the second one of this collection.
The pattern in this page is totally free, but it’s intellectual property of Elendipity. You can use it and, of course, you can sell the final products you create, but you cannot sell the pattern or any alteration of the pattern.
You should also credit Elendipity (as pattern creator) whenever you create it, share it and/or sell it.
Feel free to tag me on my Instagram if you create it, I would love to see your works!!
There is also an inexpensive ad-free pdf version of the pattern with more than 40photos to explain you the process step by step, you can buy it here:
This amigurumi is worked from the front to the back of the animal, so you will begin from the muzzle, the head and you will continue working in round creating the ears, then the legs and finally the tail.
MATERIAL
I used:
For the small cat, Hobbii Rainbow Cotton 8/6, colour n. 057 (Dusty Orange) – 10gr / Crochet hook 3mm
For the big cat, Hobbii Rainbow Cotton 8/8, colour n. 015 (Grey) – 15gr / Crochet hook 3.5mm
For the velvet yarn, Hobbii Baby Snuggle, colour n. 025 (Dusty Orange) – 60gr / Crochet hook 6mm
Here below the list of the stitches (US terms) that we are going to use for this project.
MC = Magic Circle
CH = Chain
SS = Slip Stich
SC = Single Crochet
HDC = Half Double Crochet
DC = Double Crochet
INC (Increase) = 2 stitches in the same stitch
DEC (Decrease) = 1 stitch worked over two stitches – it would be better if you know how to do Invisible Decrease.
st = stitches
BLO = Back Loop Only
FLO = Front Loop Only
BOBBLE = Bobble stitch is 5 DC together + 1 CH and more specifically: 1. Yarn over, insert the hook in the stitch, yarn over, pull through (you will have now 3 loops on your hook), yarn over and pull through only 2 loops and you will now have 2 loops on your hook; 2. Yarn over, insert the hook in the stitch, yarn over, pull through (you will have now 4 loops on your hook), yarn over and pull through only 2 loops, you will now have 3 loops on your hook; 3. Yarn over, insert the hook in the stitch, yarn over, pull through (you will have now 5 loops on your hook), yarn over and pull through only 2 loops, you will now have 4 loops on your hook; 4. Yarn over, insert the hook in the stitch, yarn over, pull through (you will have now 6 loops on your hook), yarn over and pull through only 2 loops, you will now have 5 loops on your hook; 5. Yarn over, insert the hook in the stitch, yarn over, pull through (you will have now 7 loops on your hook), yarn over and pull through only 2 loops, you will now have 6 loops on your hook;6.Yarn over and pull through all the 6 loops and now you do 1 CH
Number in brackets, at the end of each round, indicates the total stitches for the round.
Instruction between * … * means you have to repeat what is between the asterisks by the times indicated after the second asterisk.
Instruction between ( … ) means you have to do all the stitches in the brackets in the same stitch.
You will always find the acronym of the stitch and a number close to it; if the number is before the name of the stitch, it means that you will have to repeat those stitches in the same space. For example: 5 DC = 5 Double Crochet in the same stitch / DC 5 = 5 Double Crochet in the next 5 stitches
There is also an inexpensive ad-free pdf version of the pattern with more than 40 photos to explain you the process step by step, you can buy it here:
* DEC, SC 2 * x 3, DEC, Tail (FLO: SS 1, 11 CH, – starting from the 2nd CH from the hook – SC 1, HDC 2, DC 1, HDC 2, SC 3, SS 1 and SS 1 in same FLO where you did the first SS), SC 1, * DEC, SC 2 * x 2 (18)
ROUND 19
* DEC, SC 1 * x 6 (12)
For the 4th DEC you will do a normal DEC, not Invisible Decrease because you will have a normal SC + a BLO
ROUND 20
* DEC * x 6 (6)
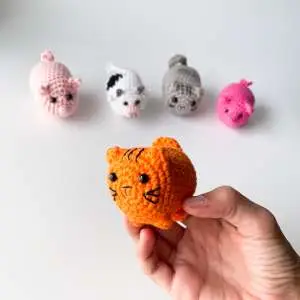
And HERE WE ARE: your CAT amigurumi no sewing is done!
Now you can decide to leave it like this or to add a keychain.
You can also embroider some whiskers and stripes like I did and you can create it in different sizes and colours!
I hope you enjoyed this Free Pattern
At this linkyou can find the same pattern but it’s an ad-free PDF version with more than 40 photos that will guide step by step through the process.
I have other many patterns available that you can find at this link.
Don’t hesitate to contact me if you need any explanation for the pattern – you can write me at info@elendipity.com.
I also offer crochet lessons (both in person or online) if you need some help with crochet creations and reading patterns.
You find all the info for the classes at this link.
Feel free to tag me on my Instagram if you create it, I would love to see your works!
When I finishing R18, after *DEC, SC2* x2 I still have 2 SC left, what do I need to do? SC2? But when I add extra SC2, I also have 2 SC left after finishing R19, so R19 total 14 stitches. I’m confused. Please help me. Thanks
Hi!
R18 says: * DEC, SC 2 * x 3, DEC, Tail (FLO: SS 1, 11 CH, – starting from the 2nd CH from the hook – SC 1, HDC 2, DC 1, HDC 2, SC 3, SS 1 and SS 1 in same FLO where you did the first SS), SC 1, * DEC, SC 2 * x 2 (18)
You should have 18 stitches without having any stitch left, let me explain to you step by step: you do *DEC, SC2* three times and that’s 9 stitches, then you have another DEC so you have now 10 stitches, then you have the tail which count as 1 stitch even if you are using only the Front Loop, so we are now at 11 stitches; after the tail you’ll have SC 1, so we are now at 12 stitches and then you will have *DEC, SC2* twice which are 6 stitches + the 12 you had until now, in total you will have 18 stitches.
Could that be that you didn’t count the SS that you do in the tail?
If this wasn’t clear enough for you, I’m happy to help further if you want to send me a photo of your R18 to my email info@elendipity.com, I’ll try to help as much as I can 🙂
We use cookies on our website to give you the most relevant experience by remembering your preferences and repeat visits. By clicking “Accept All”, you consent to the use of ALL the cookies. However, you may visit "Cookie Settings" to provide a controlled consent.
This website uses cookies to improve your experience while you navigate through the website. Out of these, the cookies that are categorized as necessary are stored on your browser as they are essential for the working of basic functionalities of the website. We also use third-party cookies that help us analyze and understand how you use this website. These cookies will be stored in your browser only with your consent. You also have the option to opt-out of these cookies. But opting out of some of these cookies may affect your browsing experience.
Necessary cookies are absolutely essential for the website to function properly. These cookies ensure basic functionalities and security features of the website, anonymously.
Cookie
Duration
Description
cookielawinfo-checkbox-analytics
11 months
This cookie is set by GDPR Cookie Consent plugin. The cookie is used to store the user consent for the cookies in the category "Analytics".
cookielawinfo-checkbox-functional
11 months
The cookie is set by GDPR cookie consent to record the user consent for the cookies in the category "Functional".
cookielawinfo-checkbox-necessary
11 months
This cookie is set by GDPR Cookie Consent plugin. The cookies is used to store the user consent for the cookies in the category "Necessary".
cookielawinfo-checkbox-others
11 months
This cookie is set by GDPR Cookie Consent plugin. The cookie is used to store the user consent for the cookies in the category "Other.
cookielawinfo-checkbox-performance
11 months
This cookie is set by GDPR Cookie Consent plugin. The cookie is used to store the user consent for the cookies in the category "Performance".
viewed_cookie_policy
11 months
The cookie is set by the GDPR Cookie Consent plugin and is used to store whether or not user has consented to the use of cookies. It does not store any personal data.
Functional cookies help to perform certain functionalities like sharing the content of the website on social media platforms, collect feedbacks, and other third-party features.
Performance cookies are used to understand and analyze the key performance indexes of the website which helps in delivering a better user experience for the visitors.
Analytical cookies are used to understand how visitors interact with the website. These cookies help provide information on metrics the number of visitors, bounce rate, traffic source, etc.
Advertisement cookies are used to provide visitors with relevant ads and marketing campaigns. These cookies track visitors across websites and collect information to provide customized ads.
2 Comments
Ita
January 24, 2023 11:23 amWhen I finishing R18, after *DEC, SC2* x2 I still have 2 SC left, what do I need to do? SC2? But when I add extra SC2, I also have 2 SC left after finishing R19, so R19 total 14 stitches. I’m confused. Please help me. Thanks
elendipity
January 24, 2023 11:40 amHi!
R18 says: * DEC, SC 2 * x 3, DEC, Tail (FLO: SS 1, 11 CH, – starting from the 2nd CH from the hook – SC 1, HDC 2, DC 1, HDC 2, SC 3, SS 1 and SS 1 in same FLO where you did the first SS), SC 1, * DEC, SC 2 * x 2 (18)
You should have 18 stitches without having any stitch left, let me explain to you step by step: you do *DEC, SC2* three times and that’s 9 stitches, then you have another DEC so you have now 10 stitches, then you have the tail which count as 1 stitch even if you are using only the Front Loop, so we are now at 11 stitches; after the tail you’ll have SC 1, so we are now at 12 stitches and then you will have *DEC, SC2* twice which are 6 stitches + the 12 you had until now, in total you will have 18 stitches.
Could that be that you didn’t count the SS that you do in the tail?
If this wasn’t clear enough for you, I’m happy to help further if you want to send me a photo of your R18 to my email info@elendipity.com, I’ll try to help as much as I can 🙂
Leave a Comment